Code reusability patterns for Next.js
Sometimes it’s convenient to have one Next.js codebase serve multiple discrete sites. The sites might have different content and design but also share code – such as having the same React component to render the header or sidebar.
A typical example could be a web development agency that wants to put multiple customers on a shared platform, or a media house serving multiple brands.
This post aims to be an overview of methods to share code between multiple related Next.js projects.
Let’s dive into this topic and talk about the first big decision you have to make – multitenancy or monorepo.
Multitenancy or Monorepo?
Ultimately we’re trying to accomplish a simple thing – sharing code between different, yet similar discrete websites. However, there are different ways to achieve this. One way could be to build just one Next.js application that could handle all of our sites. In this blog post, we refer to this as the multitenant approach. Another way would be to build multiple Next.js apps, but each app would share some React components or other functionality with each other. In this post we will refer to this as the monorepo approach.
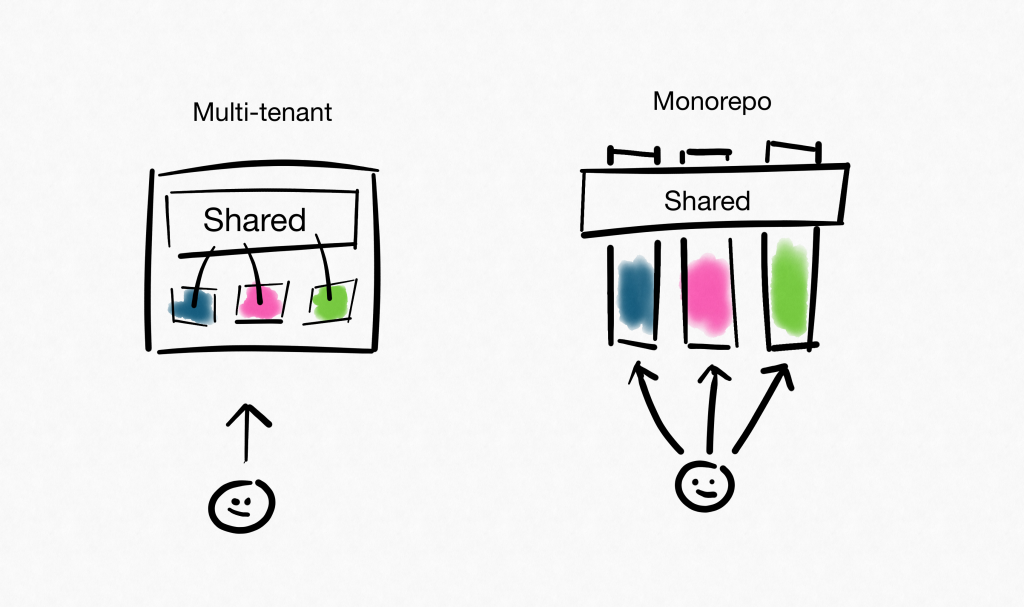
The biggest practical difference is that in the multitenant approach, you have only one running application that can handle all of your sites at runtime. This means you only build your project once and that code for all of your site variations will be present in the resulting bundle. Of course, you can still take advantage of bundle splitting and the dynamic import feature of Next.js to serve users with the appropriate code for the site they are visiting.
On the other hand, with a monorepo approach, you would instead build each of your sites into a separate Next.js site. This means that you will have to run multiple instances of your application at runtime, one for each discrete website. This might seem daunting at first, but the upsides is that your bundle size is reduced and typically you have a bit more control, as we will see below. With tools such as Docker and serverless solutions platforms like Vercel, it is easier than ever to set up multiple instances of an application.
Let’s look at some code-sharing approaches specific to Next.js! What’s common to all approaches below is that they try to preserve the good parts about Next.js, such as the file system-based routing.
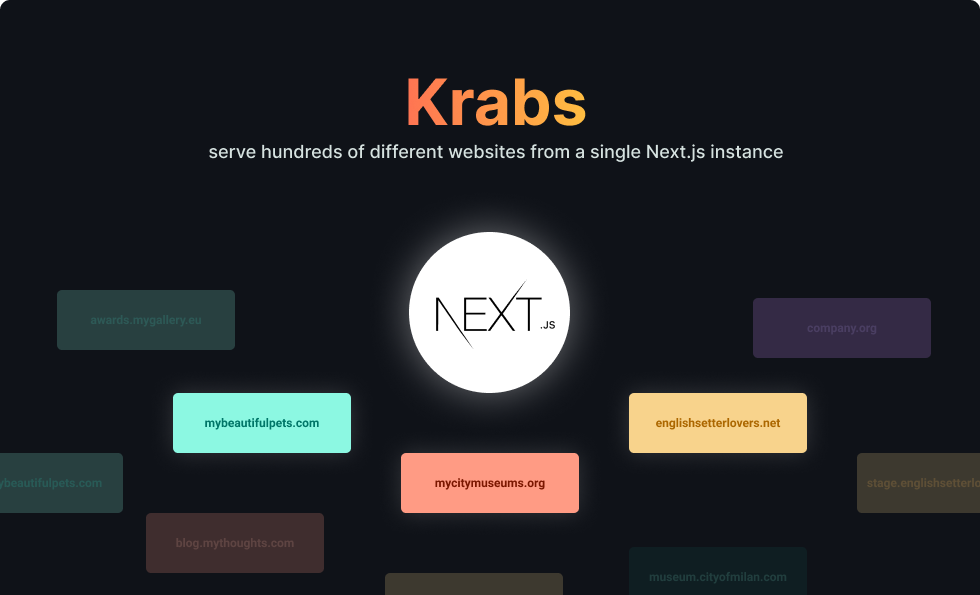
💁 Multitenancy approach #1 – Custom server
In this approach, a custom server is set up and maps individual sites to their own folders inside your pages folder. You can do this manually yourself (here is one example), but I will focus on a great library available for this called 🦀 Krabs.
Whereas in vanilla Next.js you would have something like:
pages/
  login.js
  blog.js
With Krabs, you instead have the following directory structure:
pages/
  site-1.example.org/
    /login.js
    /blog.js
  site-2.example.org
    /login.js
    /blog.js
Installing and configuring Krabs is simple by following the getting started guide in the documentation.
The caveats to this approach are that a custom server is not compatible with deploying to Vercel. You also can’t set up unique API routes for each website, nor can you have a unique public folder per website.
The last two downsides can be easily remedied by adding your own middleware. Since you have already configured a custom server, this is a non-intrusive procedure.
📝 Multitenancy approach #2 – Rewrites
Next.js recently added support for Rewrites – essentially a regex matching engine that supports rewriting parts of the query. More importantly, you can dynamically match on headers, cookies, and query parameters. A multitenancy approach using rewrites was developed.
While this approach supports deploying to Vercel because it does not use a custom server, the extra catch-all routes adds a bit of cruft to the structure and the rewrites configuration becomes quite tangled. This approach also doesn’t support separate API routes or a separate public folder per site.
🐉 Monorepo approach #1 – Lerna
Now we’re getting into monorepo territory, which brings existing JavaScript tooling that Next.js can take advantage of. Lerna is one of the most popular tools for breaking up a big JavaScript project into individual packages that can be cross-referenced across your project.
In this setup, you typically create one component package that will house your shared React components, and then one or more individual Next.js installations that will represent your sites.
There is a great tutorial on utilizing this approach here.
While this approach maximizes the freedom you have, I find it not ideal, since you will be duplicating a lot of boilerplate code across your sites. This includes all the config files for Next.js such as next.config.js. There is also no way to centrally upgrade a package. For example, to upgrade to a new Next.js version you have to navigate to each site and update it individually.
🧶 Monorepo approach #2 – Yarn workspaces
Since version 1.0, Yarn has a feature called Workspaces to allow sharing packages in the same repository. It’s a very similar approach to Lerna conceptually, where under a special packages/ folder you can have multiple self-contained Next.js sites, as well as a shared/ folder for all your shared components and code.
There’s an excellent tutorial you can follow here.
I like this approach more than Lerna because it has fewer moving parts and ceremonies around handling packages, but it also suffers from the same cons, such as that you can’t easily upgrade the dependencies on every site at once.
🔗 Monorepo approach #3 – Symlinking
Finally, I present a proof of concept that I made. I first mocked up my dream file structure:
shared  # Shared across all sites
  /utils # Utilities and modules
  /components # React components
sites   # Site folder
  /site-1  # Discrete site
    /components  # Site-specific components
    /pages       # Site-specific pages
    /public      # Site-specific public folder
    /styles      # Site-specific files
  /site-2
    /components
    /pages
    /public
    /styles
  ...
After that, I wrote a bash script that would symlink the pages & public folder to where Next.js would expect to find them (in the root) by running ./switch.sh site-1.
When you are done working with site-1, you run ./switch site-2, restart your Node process and you’re working on the second site!
Surprisingly, this approach worked! It’s only about 10 lines of bash code and doesn’t touch Next.js. It supports individual API and public folders, and you could even deploy it to Vercel. (In your CI, you would switch to each site, build it and then deploy it to Vercel.
The downside is that this approach is quite crude, and it can get confusing about which files you are working on since you will see the symlinked folders. I’ve added a special VSCode configuration to my example repo that hides symlinked files to that they are easier to work with.
You can find my proof of concept here.
Making a decision
Before deciding, I would ask myself these questions:
- Will I have just a few or hundreds/thousands or sites? (If many sites, a multitenancy approach is preferable.)
- Will I need to have unique sets of API routes for each site? (If yes, a monorepo approach is preferable)
- Are the sites very much like each other? (The more alike, the stronger the case for a multitenant approach)
- Do I want to be able to upgrade site dependencies individually? (If yes, this is a strong case for a monorepo approach)
Credits
Hand-drawn figures by Stanislav Khromov, licensed under CC BY. Krabs header from Krabs project GitHub.
View Comments
Using Leaflet with SvelteKit
Having just started on a new SvelteKit project, I was tasked with implementing a...
 omar
omar
Authorthanks for sharing this really helpful guide and insightful.