Dockerizing Your SvelteKit Applications: A Practical Guide
If you’re looking to containerize your SvelteKit application, you’ve come to the right place. In this post, we’ll walk through creating a Dockerfile for a SvelteKit app using adapter-node. Let’s dive in!
Configure SvelteKit to use adapter-node
First, let’s install adapter-node which builds your site for Node.js:
npm i -D @sveltejs/adapter-nodeThen, open the svelte.config.js file and change the adapter:
- import adapter from '@sveltejs/adapter-auto';
+ import adapter from '@sveltejs/adapter-node';
The Dockerfile
Now let’s write the Dockerfile which will tell Docker how to build your application:
FROM node:22-alpine AS builder
WORKDIR /app
COPY package*.json ./
RUN npm ci
COPY . .
RUN npm run build
RUN npm prune --production

FROM node:22-alpine
WORKDIR /app
COPY --from=builder /app/build build/
COPY --from=builder /app/node_modules node_modules/
COPY package.json .
EXPOSE 3000
ENV NODE_ENV=production
CMD [ "node", "build" ]
Don’t worry if this looks intimidating – let’s break it down step by step.
How does it work?
We’re using a technique called multi-stage builds. This allows us to keep our final Docker image lean and mean by discarding everything we don’t need after the build process.
The Build Stage
In the first part, we’re setting up our build environment:
- We start with a Node.js Alpine image. Alpine is a lightweight Linux distribution, specifically adapted for containers.
- We set our working directory to
/app. - We copy over our package files and install dependencies.
- We copy the rest of our source files and build the SvelteKit app itself.
- Finally, we prune our dependencies to production-only.
The Final Stage
Now we set up our actual production image:
- We start fresh with another Alpine Node.js image.
- We copy over just what we need from the build stage – our built app, production node_modules, and package.json.
- We expose port 3000 (the default for adapter-node).
- We set NODE_ENV to production.
- Finally, we tell Docker how to start our app by calling
node buildwhich will actually runnode build/index.js.
Creating the .dockerignore file
We’ll also want a .dockerignore file:
Dockerfile
.dockerignore
.git
.gitignore
.gitattributes
README.md
.npmrc
.prettierrc
.eslintrc.cjs
.graphqlrc
.editorconfig
.svelte-kit
.vscode
node_modules
build
package
**/.env
This keeps unnecessary files out of our Docker build context, speeding things up and reducing the final size of the output image.
Why use a multi-stage build?
You might be wondering why we go through all this trouble:
- We keep our final image small by discarding build tools and dev dependencies.
- We leverage Docker’s layer caching to speed up builds.
- We follow best practices for Node.js in Docker, like using
npm cifor consistent installs.
devDependencies vs normal dependencies in adapter-node
When using adapter-node, there’s a small quirk regarding how dependencies are bundled!
The General Rule
In most cases, you should install all your dependencies as devDependencies. If you do this, SvelteKit will use Rollup to bundle these dependencies into your app, and also discard any unused imports. That means in general you should always install new packages with the -D flag, like npm i -D lucide-svelte. You should do this regardless if it’s a client-side or server-side library.
When Things Get Tricky
Sometimes, you might run into issues during the build process. A common error is __dirname is not defined, but it can be other errors as well. If this happens, you may need to move the dependency to be a normal, non-dev dependency. What this means in practice is that SvelteKit will not attempt bundle it with Rollup, and instead leave it in node_modules to be loaded from there at runtime.
To ship node_modules or not?
If you manage to make all your dependencies be devDependencies, you technically don’t have to ship node_modules at all! In this case you can completely remove the following step from the final stage:
# Remove this step to not ship node_modules in your image
COPY --from=builder /app/node_modules node_modules/
Even though the pruning step should remove dev dependencies, I’ve found that you can reduce the size of the image a bit by not shipping node_modules.
Building our container
Now that we have our Dockerfile set up, let’s build and run our Docker image. First, make sure you’re in the directory containing your Dockerfile, then run:
docker build -t my-sveltekit-app .This command builds the Docker image and tags it as “my-sveltekit-app”. The . at the end tells Docker to look for the Dockerfile in the current directory.
Once the build is complete, you can run your containerized app with:
docker run -p 3000:3000 my-sveltekit-appThis command runs your app and maps port 3000 of the container to port 3000 on your host machine. You should now be able to access your SvelteKit app by navigating to http://localhost:3000 in your web browser.
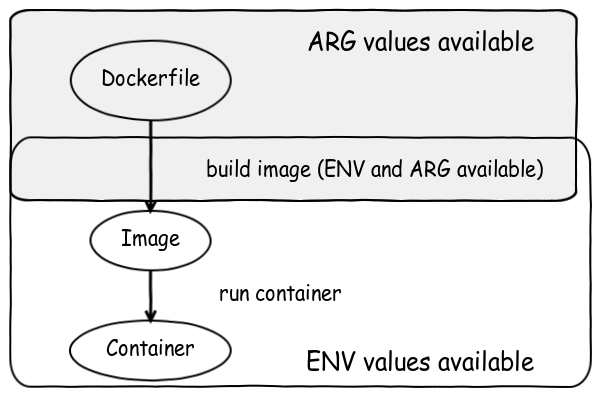
Handling Environment Variables in Docker
SvelteKit provides four different ways to import environment variables, let’s break down how each of these interact with Docker.
$env/dynamic/private
The dynamic private import allows you to have runtime environment variables. The upside with this sort of variable is:
- They don’t have to be defined at build time
- They can be easily changed at any point (for example, updating a secret API key)
Runtime variables can be set in different ways:
- Hard coded in the Dockerfile:
ENV API_SECRET=secret- Passed when running the container:
docker run -e API_SECRET=secret my-sveltekit-app- Used with a .env file:
docker run --env-file .env my-sveltekit-appKeep in mind these variables are not available during prerendering, so don’t use them in pages that are prerendered.
$env/dynamic/public
These are similar to private dynamic variables, but they’re exposed to the client. They should start with PUBLIC_ (by default). Handle them the same way as private dynamic variables.
$env/static/private
These environment variables are build time variables. That means they need to be accessible when you are building your application. These variables will be baked into your Docker image. This can be problematic because:
- Any secrets you put here will be part of your image
- You cannot easily rotate any of these keys, a full rebuild of the image is required.
To use static variables:
- Add a build argument in your Dockerfile:
ARG API_KEY- Pass the build argument when building the image using
--build-arg
docker build --build-arg API_KEY=your_api_key -t my-sveltekit-app .$env/static/public
These are similar to static private variables but are exposed to the client and should start with PUBLIC_ (by default). Handle them the same way as static private variables.
Static public variables have an important use case – if you are building your SvelteKit application with adapter-static (to make a SPA), then you cannot use private environment variables, and since your whole application is static, you will need to rebuild it regardless of the change you want to make, so static public variables are very useful to easily be able to change how the application is configured.
Some final words on environment variables
You will probably be deploying your application on a platform like CapRover or Coolify, and these platforms have different way of differentiating build time and runtime environment variables. For example, if you build your app using GitHub Actions, any static variables (ARG) will have to be configured in GitHub, while the dynamic ones (ENV) are configured in CapRover or Coolify. Refer to the docs for each platform and always keep in mind that different platforms will handle build and runtime variables differently.
If you want to go deeper into static vs dynamic environment variables in Docker, I suggest this blog post.
Form Actions
One small quirk when running SvelteKit in Docker containers is that form actions and other server-side features need to know the correct URL of your application. Without proper configuration of the ORIGIN environment variable you’ll run into the dreaded “Cross-site POST form submissions are forbidden” error when submitting a form.
Let’s fix this properly pass the ORIGIN runtime variable. In production, this will have to correspond to your actual production domain, eg. https://my-domain.com. It cannot be https://localhost:3000 like in the example below unless you are just testing locally.
docker run -p 3000:3000 -e ORIGIN=http://localhost:3000 my-sveltekit-appYou’ve packaged SvelteKit in a Docker container – now what?
If you’ve successfully packaged your app in a container, you might wonder – what now? The beauty of Docker is that there are hundreds of providers that support it natively at all price points, so you have plenty of options.
If you’re looking for a self-hosted option, I suggest checking out the tutorial I made below which shows you how to set up all your SvelteKit projects on a cheap Virtual Private Server using Docker and the wonderful CapRover PaaS interface. You can also easily add a database like Postgres, MySQL or SQLite to your project.
Wrapping Up
And there you have it! With the Dockerfile we’ve built, you’re ready to containerize your SvelteKit app. Remember, you might need to tweak things based on your specific setup, but this should give you a solid starting point.
Have you tried Dockerizing your SvelteKit app? How did it go? Let me know in the comments!
This guide was inspired by the following gist by Arad Alvand.
Illustration photo by frank mckenna on Unsplash
View Comments
Is Web Development About to Change?
If you’ve been keeping up with web development trends lately, you’ve probably heard...
 Adam
Adam
AuthorJust wanted to say thanks for your Svelte(Kit) posts. They are pitched at exactly the right level for me, enough information to not get lost and clearly presented so I can easily skim the parts I already know. Thanks!
 Stanislav Khromov
AuthorThank you for the kind words Adam, they mean a lot to me! ☀️
 Michael Stark
AuthorThanx man. A little over my head but I’m willing to learn from those who are ahead.
You did a very good job explaining everything so noobs like me can grasp the difficulties.
 Adam
Adam
AuthorWhen I was first learning about building Docker images, all the example `Dockerfile`’s confused me because the file pathing was ambiguous. For example when I first saw a `Dockerfile` like yours I had these confusions:
– I know what `.` means in Unix, but how do I know what it refers to here?
– What on earth does `COPY . .` do?
– What does `–from=builder` mean?
– Why can’t I find the `node build` command?
I spent some and made a `Dockerfile` that wasn’t ambiguous about any of these things.
“`
FROM node:current-alpine AS builder
WORKDIR /staging
COPY . /staging/
RUN corepack enable && \
pnpm install –frozen-lockfile && \
pnpm build && \
pnpm prune –prod
FROM node:current-alpine
WORKDIR /app
COPY –from=builder /staging/package.json /staging/pnpm-lock.yaml /app/
COPY –from=builder /staging/node_modules /app/node_modules
COPY –from=builder /staging/build /app/build
“`
Maybe it will make the `Dockerfile` less confusing to someone else as well.
 Anonymous
AuthorHi Stanisalv,
Nicely written, thanks. I tried this on the Svelte 5 demo app (with SvelteKit) and everything works apart from the Sverdle app. When I try to enter a guess, nothing happens other than receiving a POST http://0.0.0.0:3000/sverdle?/enter 403 (Forbidden) error. Note, `docker run -p 3000:3000 my-app` returns Listening on 0.0.0.0:3000
Any thoughts on why this is happening?
Thanks!
 Anonymous
Authormy bad, I forgot to include your last step to handle form actions, e.g.
docker run -p 3000:3000 -e ORIGIN=http://localhost:3000 my-app
 Colin
Colin
AuthorGreat tutorial. I like how you put the Dockerfile right at the start so we can copy/paste without needing to read the whole article – if that’s all we needed 😅
Also using a multi-stage build by default was unnecessary for a tutorial, but very appreciated because I think many people will just copy/paste the Dockerfile and use it forever.
Thank you for writing articles that respect developers. You don’t make us walk step by step through every little detail to be sure we were forced to learn everything. You’re not trying to maximize engagement and time spent on your site by rambling. You’re first and foremost, trying to help us. I really appreciate that.
 Stanislav Khromov
AuthorThank you for reading and commenting!