How I published a gratitude journaling app for iOS and Android using SvelteKit and Capacitor
In this blog post I’d like to share with you how I self-published Appreciation Jar, a gratitude journaling app for couples.
If you want to see how the app looks before you start to read, here is a short demo video:
The idea
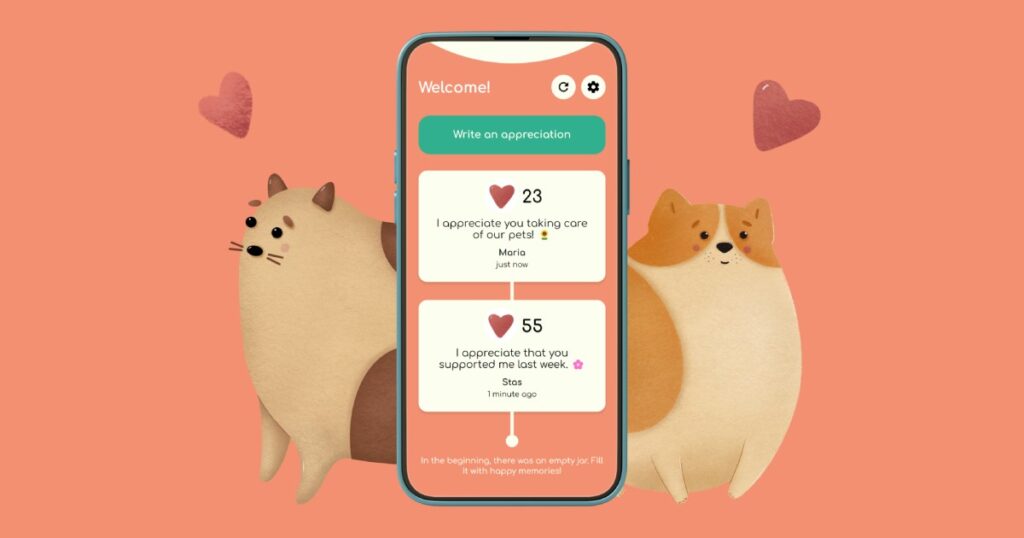
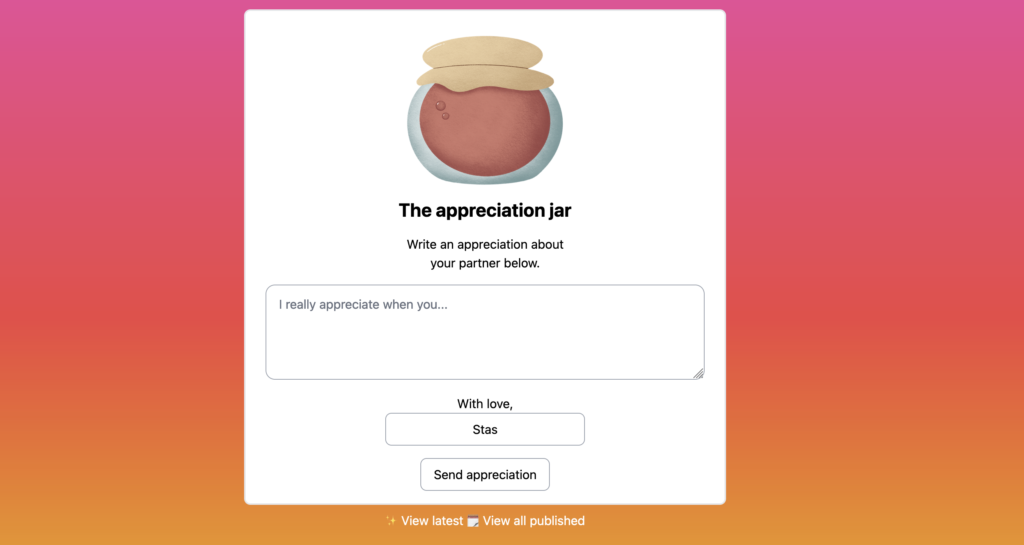
My partner and I were looking for ways to be more mindful of each other and share positive affirmations. We originally started with a physical jar that we dropped small hand written notes in (I guess you could call it the original “MVP“). One late evening, in a particularly developer-focused mood, I decided to take the hammer of technology to the idea and spent a couple of weekends building a digital appreciation jar prototype with PHP and Tailwind. The result can be found in this GitHub repo.
The prototype was a success and we used it for several months. During those months the idea of building an actual app grew.
The design
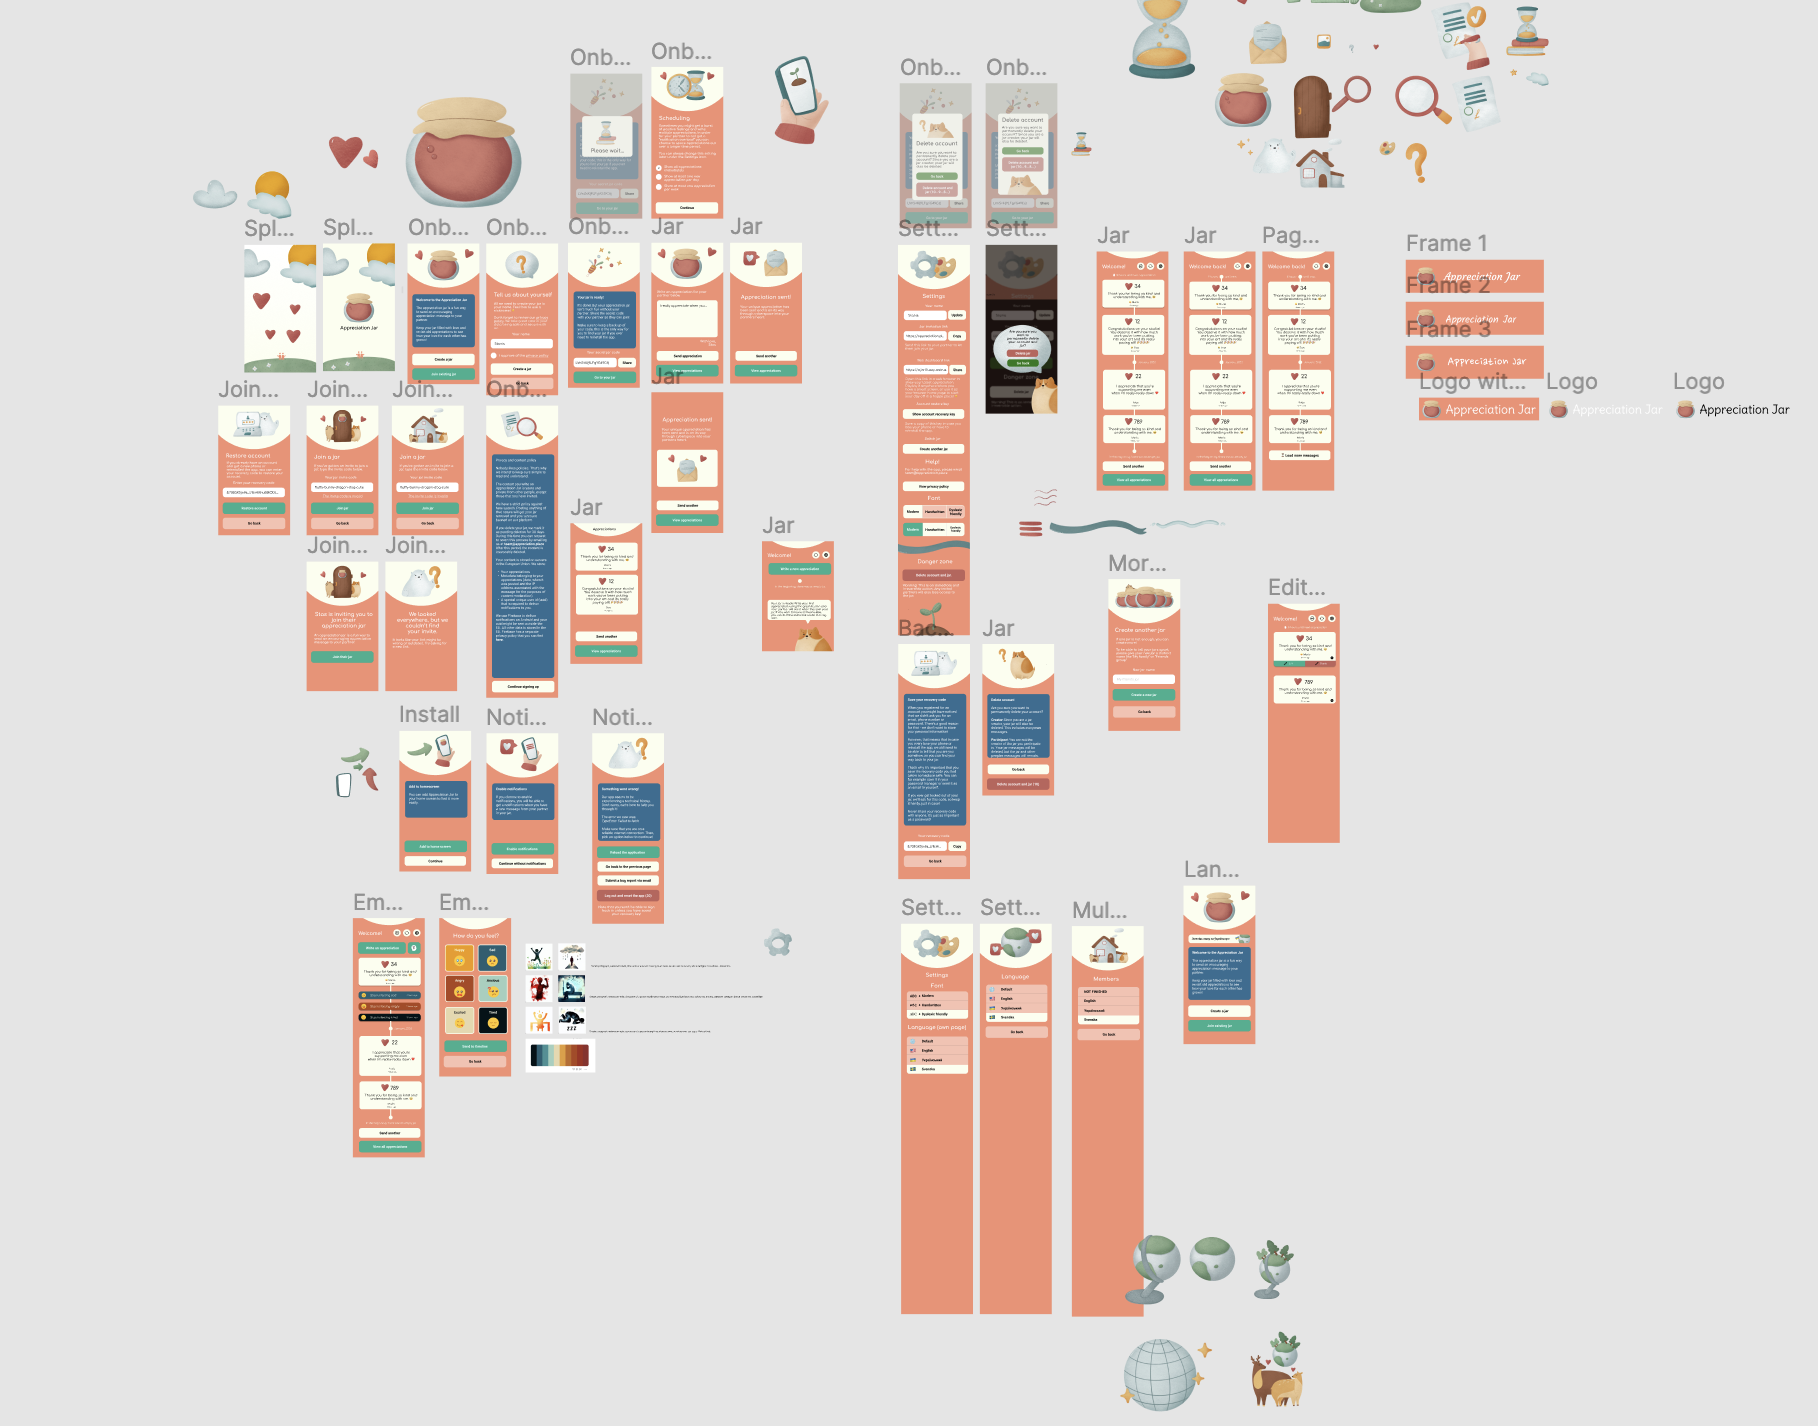
I had never designed a complex app from scratch before, so one thing that took me by surprise was how long it took. I spent about a month worth of evenings to get the initial sketches done. In retrospect I should have been able to predict this, design is an incredibly complex craft that takes a lifetime to master. You live and learn!
I used Figma as the design tool and Icons8 for the illustrations. One thing I really like about Icons8 is that they have illustration sets, so you can get multiple illustrations in the same style, which gives the app a professional feel since all illustrations are consistent.
Going from web to native
I knew that if I wanted to publish the app in regular app stores, my prototype needed a complete overhaul. It was lacking basic features such as the ability to support more than one jar, an authentication system, an onboarding guide and much more. I had also heard that publishing an app that was just a “frame” to show an existing website was generally not encouraged, especially in the Apple app store.
I have great respect for native app developers, and at the same time I knew that learning both iOS and Android development followed by implementing the app in two code bases (+ web) would be an infeasible task as a side project, so I decided that I needed to make this based on web technologies and try to have only one code base.
I had also heard that Google supports Progressive Web Apps in their app store, and Apple had recently added web push support to Safari on iOS which is what many developers needed native capabilities for.
After some research I had nailed down that I would have to use either bubblewrap, PWABuilder or Capacitor. Since all those worked with Progressive Web Apps, I set out to start with building a PWA.
The first version – PWA with SvelteKit
I picked Svelte and SvelteKit as the frontend stack for the app. I believe this to be the best full-stack framework for the web today. An essential aspect for this project was its capability to compile in a multitude of ways: from a purely static Single Page Application to a complex Node.js app with a comprehensive frontend and backend.
Building the web version of the app was largely uneventful, but I learned a lot around the complexity that is required for building a complete app. Things such as onboarding, a site-wide notifications system (I used svelte-french-toast, an excellent library that deserves more love!), having to build up an entire component library of reusable components and coherent page transitions were just some of the hurdles.
One particularly interesting excursion was implementing push notifications based on the excellent Web Push series at web.dev. It was really cool to get Web Push working, even having it working in Safari on iOS (although users need to first add the app to the home screen for it to work which is quite a lot of steps and makes it hard to instruct users on how to do it properly).
Another interesting excursion was service workers. Like many things, SvelteKit makes it super easy to get started with it. If you’re interested in building a service worker for your site, I do not recommend using external libraries like Workbox or vite-pwa/sveltekit. The default implementation of a service worker in SvelteKit is just 60 lines of code, and in my humble opinion it’s not worth to bring in an extra dependency for this.
Deciding on native packaging – Capacitor!
After going through the different ways to package a web app natively, I settled on Capacitor. The reason for this was that bubblewrap only works for Android, and PWABuilder lists iOS support as experimental.
One thing I really liked about Capacitor is that it’s not just a frame to your website. In Capacitor, you build your Single Page Application as HTML, CSS and JS and package those files inside your app. On the one hand, it means that new features need to be submitted for review to the app stores, just like a native app, but on the other hand I would expect that Apple and Google prefer this approach because it removes the “black box” element that an app that just wraps a website has. In the Capacitor approach, you can determine by code analysis which content an app can render, just like a native app. It also means your app works gracefully even if the user is offline, just like if you have a service worker.
Another point in favor of Capacitor is its mature plugin ecosystem, which makes it straightforward to implement things like push notification and support native features such as light / dark mode.
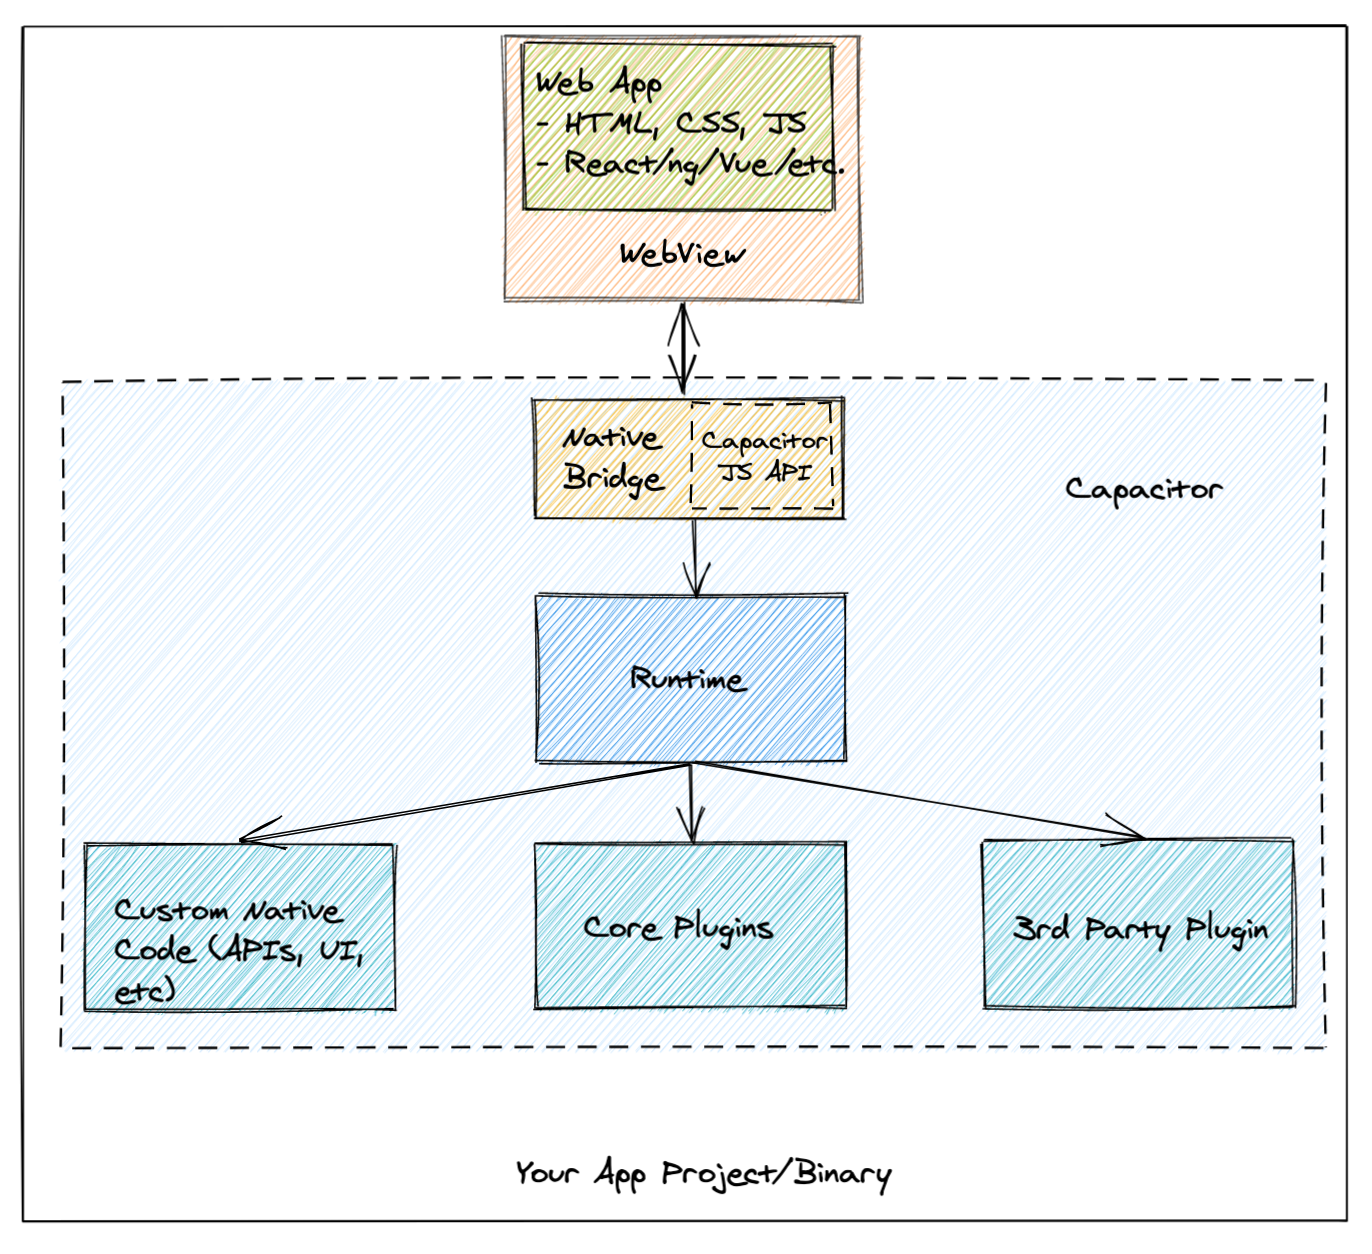
Capacitor + PWA hybrid architecture
One of the things I wanted to experiment with in this project is to have a “hybrid” architecture, where one code base would be used to deploy both the PWA (web version) and the Capacitor version. After some experimenting I came up with the architecture outlined below:
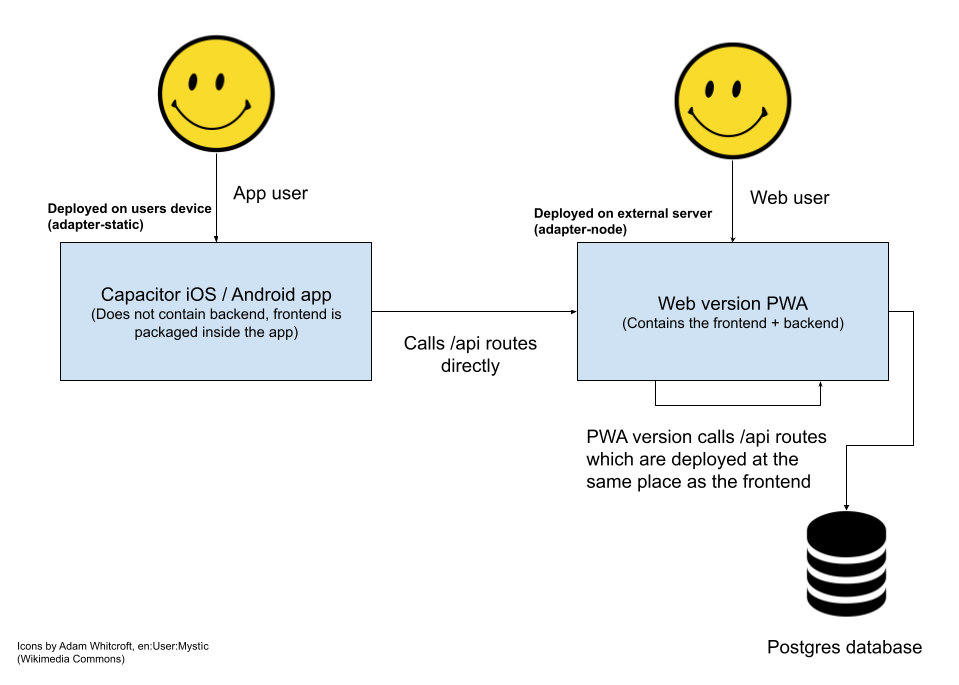
I will go more into detail about this architecture in a future blog post! The high level overview is that the app is built twice. First we build the app using adapter-node, which is then deployed to a web site (in our case you can find it at https://jar.appreciation.place ) and serves as the PWA version of the app as well as the API endpoints for the backend.
The app is also built a second time using adapter-static. This version does not have any backend endpoints baked in, because all +server.ts files in SvelteKit get stripped out of adapter-static exports unless they have export const prerender = true; set. (In which case they are prerendered as a static JSON blob of data). This is natural as adapter-static has no concept of a backend at all, it’s just HTML, CSS and JavaScript in a folder once you build it. I’ve written a wrapper for fetch that accepts a PUBLIC_BASE_URL variable that is prepended to all fetched URLs. This way I can make it so that both the adapter-node version and the adapter-static version connect to the same API endpoints. You can see an example of this fetch wrapper in this gist.
The actual code that enables building with multiple adapters is a small addition to svelte.config.js that looks for an environment variable called ADAPTER and dynamically switches the adapter based on this value:
import adapterStatic from '@sveltejs/adapter-static';
import adapterNode from '@sveltejs/adapter-node';
import preprocess from 'svelte-preprocess';

const adapter = process.env.ADAPTER === 'node' ? adapterNode : adapterStatic;
const adapterConfig =
	process.env.ADAPTER === 'node'
		? {
				out: 'build-node'
		  }
		: {
				fallback: 'index.html',
				pages: 'build-static',
				assets: 'build-static'
		  };


const config = {
	preprocess: preprocess(),
	kit: {
		adapter: adapter(adapterConfig)
	}
};

export default config;
You can then build the app with either ADAPTER=node npm run build or ADAPTER=static npm run build to choose the adapter!
Because we are working with this weird requirement of having to build with both static and node adapters, I opted to not use Form Actions for this project. Instead I added +server.ts endpoints under src/routes/api for all the data that needed to be fetched or updated. I then use a normal on:click handler on a button to trigger a fetch request to submit data. As an alternative approach, karimfromjordan posted an awesome Action (which is different from Form Actions 😅) on the Svelte Discord that can be used to use actual forms and replace use:enhance with use:form to trigger a JSON endpoint instead. If you want to see the code without joining the Discord, you can find it in this gist.
I did use +page.ts load functions heavily as those run client side and work fine with all adapters. I implemented authentication checking in hooks.server.ts, since all API requests pass through the server hooks. In the root layout (src/routes/+layout.ts) load file I added the following lines:
export const ssr = false;
export const prerender = false;
This makes sure the entire app is rendered as a Single Page Application without any server side rendering.
I didn’t use cookies for authentication, instead opting for svelte-local-storage-store on the web and @capacitor/preferences in the Capacitor version. Capacitor makes it really easy to change behavior based on whether the app is running on the web or on a native device like this:
import { Capacitor } from '@capacitor/core';
Capacitor.isNativePlatform(); // True for iOS / Android, false on web
Self-hosting with Docker and CapRover
For hosting the backend and the Postgres database, I was inspired by the “Small Web” philosophy. I decided to not use a PaaS like Vercel or Netlify because I wanted to keep GDPR compliance as simple as possible. All infrastructure for Appreciation Jar is hosted on a server in Germany. Since the goal of this project was not commercial, predictable costs was also important. On the off chance the project takes off, I don’t want to worry about incurring high costs from serverless pricing.
I used DigitalOcean for hosting a CapRover instance. CapRover is a self-hosted PaaS that runs on a Virtual Private Server. If you are curious about this approach to hosting, I recently did a talk on the Svelte Society YouTube Channel about this architecture.
Workflows in GitHub action
This app was an experiment and I wanted to try to automate as much of it as possible (at least before diminishing returns started to set in time-wise). I ended up automating a lot using GitHub Actions, such as building and deploying the backend adapter-node version automatically on CapRover, as well as building the Android and iOS versions ready to be uploaded to each respective store. I wrote a guide for Android and another one for iOS if you’re interested in the technicals of building a Capacitor app on GitHub Actions. Here are the high level workflows I ended up with:
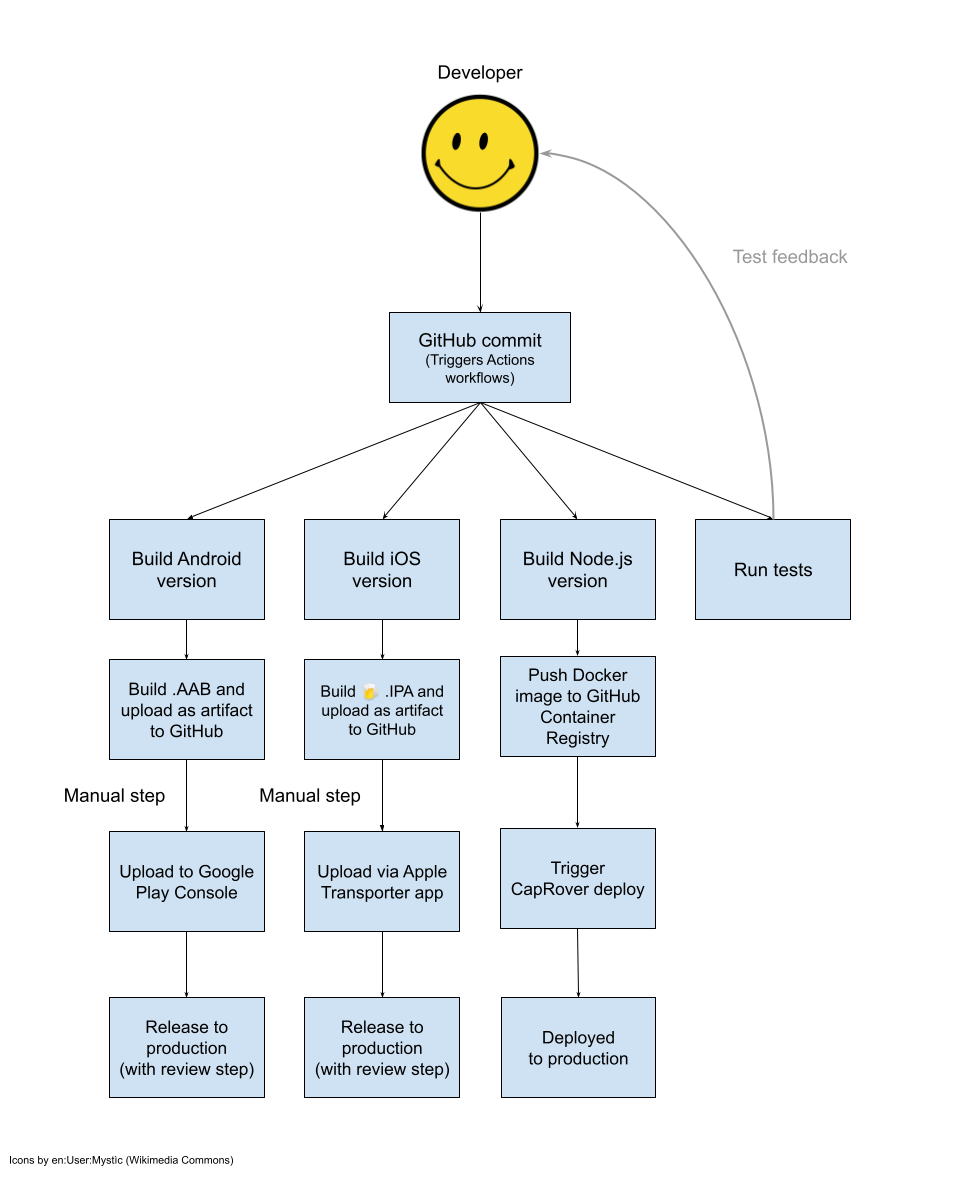
It would be possible to automate things more, for example to ship the built files directly to Google and Apple, but I felt this workflow struck an acceptable balance for me.
Publishing to Google Play
After some research, I felt fairly confident going into the Google Play review process. Google Play makes PWA a first class member and they even offer bubblewrap to help you convert your PWA into an app you can submit. I also read that people had success with using PWABuilder for their apps (which uses bubblewrap internally). I figured my Capacitor app would have a decent chance to pass.
Google Play charges a one-time fee of $25 to register as a developer, which I found very reasonable.
After submitting my app, it was approved within about 5-7 days without further questions!
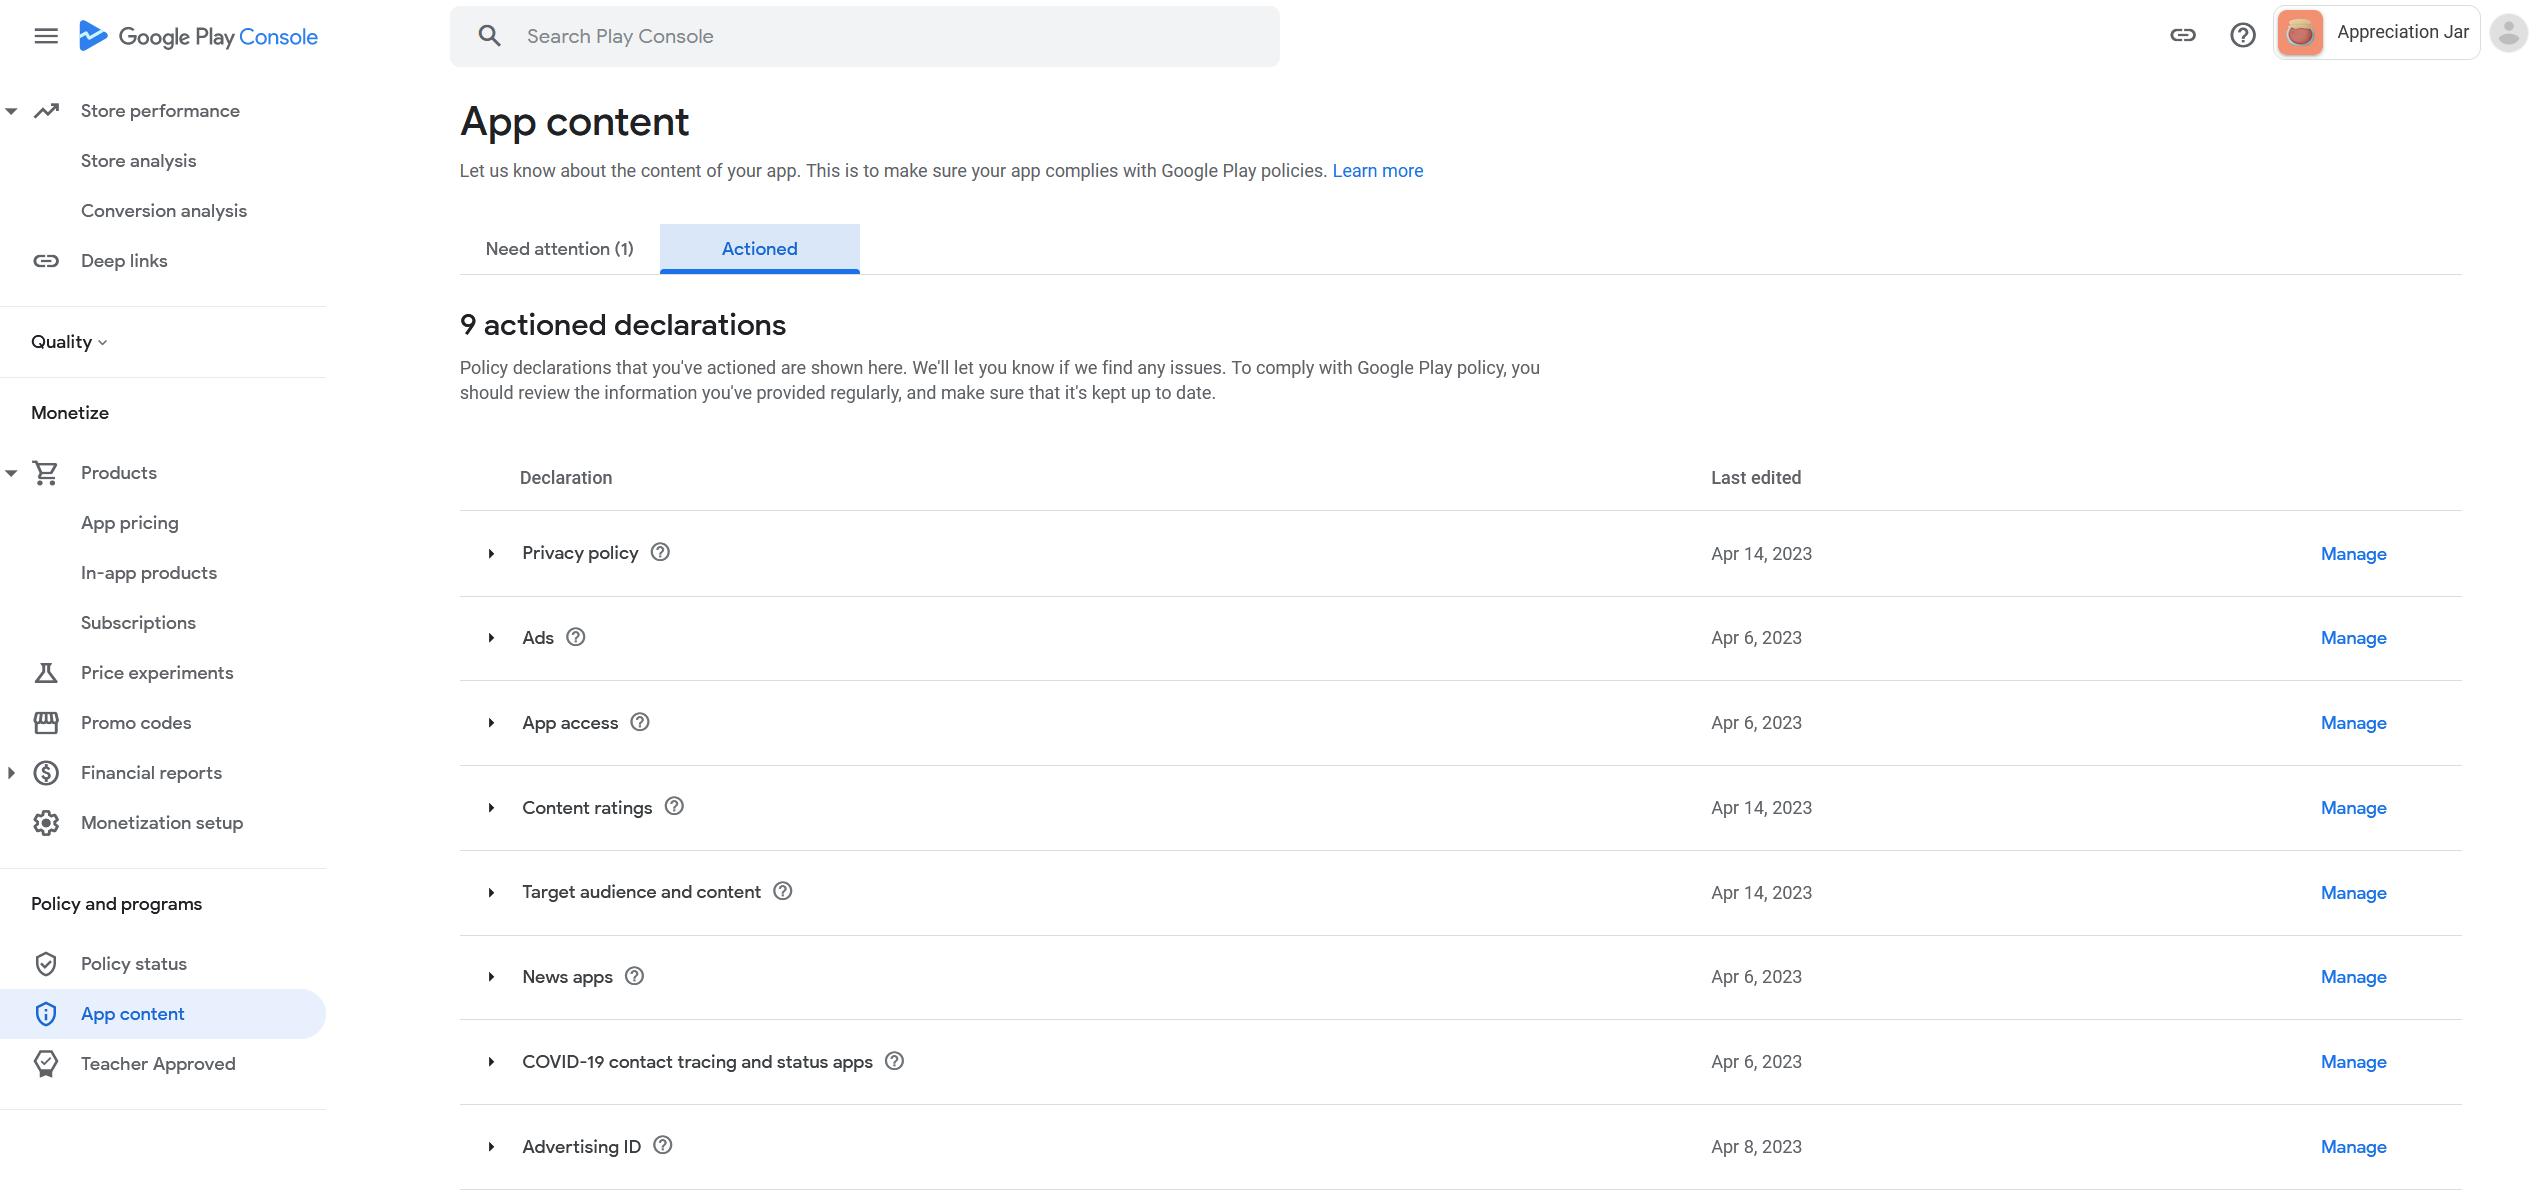
My biggest tip for publishing an app successfully is to really go in-depth and fill everything out in the Google Play Console. There’s a lot of things to fill in related to the content in your app, privacy and regulatory compliance, as well as marketing materials, but everything is documented and explained pretty well inside the console.
Publishing to Apple App store
If I felt confident about my success with Google Play, it was the opposite with the Apple app store. After doing some research, even PWABuilder (which are generally very positive about PWAs) painted a somewhat bleak picture, even calling PWAs “second-class citizens” on iOS. There are some special restrictions on web-based apps. Apple also has a “minimum functionality clause” which is pretty broad.
Feeling less confident about this submission, I researched a few ways to add native features into the app as I heard that could help with the review process. Although notifications could be considered a native feature, since Safari added push support for web apps in 16.4, I don’t think it would qualify any longer.
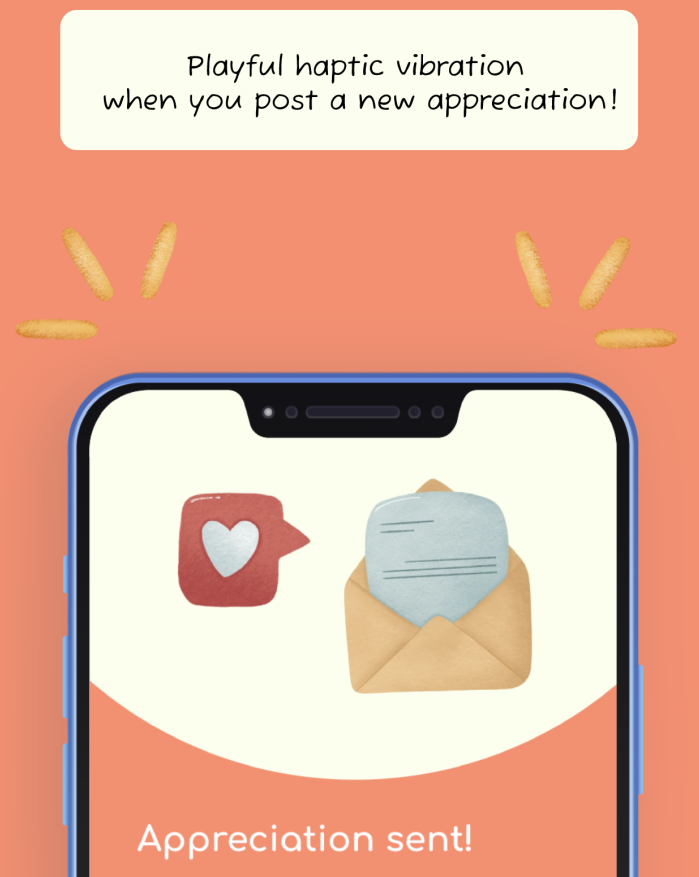
I ended up adding one iOS-specific feature, which was haptics vibrations that trigger when you add or like an appreciation. I used the Capacitor guide for building plugins for iOS and with a little help from ChatGPT for the Swift parts I soon had a small plugin that could trigger different haptics patterns. My experience with this part of Capacitor was very good. It’s super understandable and easy to work with even for a beginner like myself!
Combined with the fact that Capacitor embeds all the code inside the app (so no external code is being loaded), I hoped that this would be enough to pass the review.
Apple review and comparison to Google Play
After submitting my app, I got a very hopeful message which said that Apple reviews most apps within 48 hours. About two days later, I received a message that the review of my app would take longer. At this point my confidence was at an all-time low. 😅 About a week later, I got a message that my app was approved without further questions! So if this happens to you, try not to worry too much!
I think that I probably had some luck in the review process. I also think the fact that I didn’t have any monetization in the app could have helped, as I imagine Apple scrutinizes apps more once in-app purchases are involved.
As compared to the Google Play console, I found that there was surprisingly less to fill in regarding data privacy and in general less steps that needed to be completed. The Apple developer console is more streamlined.
The cost to register as an Apple developer is ~$100/year. I think it’s super reasonable since Apple does handle a lot of things for you like the infrastructure, manned review process and such. There is also access to XCode Cloud included, which is enough if you have a couple apps that you need to build occasionally. However, $100 is still a lot in many parts of the world, and I do wish they had a cheaper tier for solo developers.
Learnings
One of the things that was humbling was the amount of time it takes to go from a prototype that could be built in a few days to a production app, even for an application that appears as straightforward as this one.
Even though I used a lot of technology I was already comfortable with, I definitely used too many innovation tokens with all the new tech that I had to learn, which contributed to how long it took. Since this was a side project, it didn’t bother me that much since I wasn’t working towards any deadline. All things considered, this project took 7 months and 586 git commits to get to the state it is in today.
If you’re considering embarking on this journey, my advice is to start with a very straightforward project. As evident, even what’s essentially a single-page CRUD app can take a significant amount of time to develop, especially if you’re new to it. Another piece of advice is to avoid getting stressed; let things progress at their own pace and try to enjoy the learning experience as much as you can. After all, that’s why we do side projects. (or at least, I tell myself this 😅).

If you made it all the way to the end, thank you so much for reading, and I hope that you got inspired to try this out yourself! Do feel free to leave a comment if you have any questions.
I plan to make another post in the future where I go more in depth on how to practically set up a working project with everything mentioned above, but it’s going to take a while to write. If you want to know when it drops, feel free to follow me on Twitter or Bluesky!
And of course, don’t forget to try out Appreciation Jar for Web, iOS and Android!
Uses photos by Dani Guitarra on Unsplash
View Comments
Build your Capacitor iOS app bundle using GitHub Actions
Looking for building Android bundles with Capacitor? Check out this blog post...
 Emmanuel B
AuthorI really enjoyed this read. I’ll be embarking on a similar journey, but also learning svelte and svelte kit. Thanks for sharing.
 Anonymous
AuthorAwesome article! Crystal clear concepts, thanks so much for sharing this!
 Jerryc
AuthorGR8! THX
 korean
Authornice
 Josh Stauffer
AuthorStanislav, I really enjoyed reading this post. I ended up here because I was looking up SvelteKit. Never used it but am considering it. But you mentioned so many things that have been on my mind that I had to read to the end. Thanks for sharing this post with us.
 Stanislav Khromov
AuthorThanks for reading and commenting Josh!
 Chris
Chris
AuthorThanks for this write up. I was researching capacitor apps and I really love the way you made it feel. Also, love the idea, super cute
 Ralph W
AuthorThanks for sharing!
 Coder
Coder
AuthorDid you ever consider Tauri? If so what made you choose Capacitor over it?
 Stanislav Khromov
Author👋 When this project started the Tauri iOS/Android support was not announced yet. I tried it (admittedly a while ago) and it felt pretty alpha. I look forward to Tauri becoming an alternative for Capacitor but for now the ecosystem of Tauri is not big enough. However it should be pretty straightforward to move from one or the other if necessary, you don’t lock yourself in very much.
 dallas
AuthorWas a nice read and loved the flow and get excited as you kept taking it further, came here due to your Reddit post about having a hybrid architecture. Thanks again for putting in the time to share your learnings!
 Stanislav Khromov
AuthorThank you for reading and good luck with your future projects!
 StoneKnocker
AuthorBro, amazing development journey