The Comprehensive Guide to Locals in SvelteKit
In this blog post we’ll go over a lesser documented but powerful part of SvelteKit – event.locals.
Locals are a way to register trusted, server-side, per-request state. The most common use case for locals is to associate some type of data with the current request. Example use cases for locals are:
- Identify who the currently logged in user is
- Implementing access controls, such as what a logged in user can access
- Attach a unique identifier to each incoming request (eg.. for error monitoring purposes)
- Light / dark mode toggle or other user preferences
- Feature toggles
- A/B testing
Since locals are per-request, they don’t leak between requests, and disappear immediately when the request has been delivered to the user.
Locals are common in other frameworks – you might already be familiar with them from Express.js or Koa1.
Locals can only be set on the server side, which is why we call them trusted. They are typically set in hooks.server.js, which is the one place in SvelteKit where all server-side requests pass through.
Let’s look at a graph showing how locals data flows through a SvelteKit application:
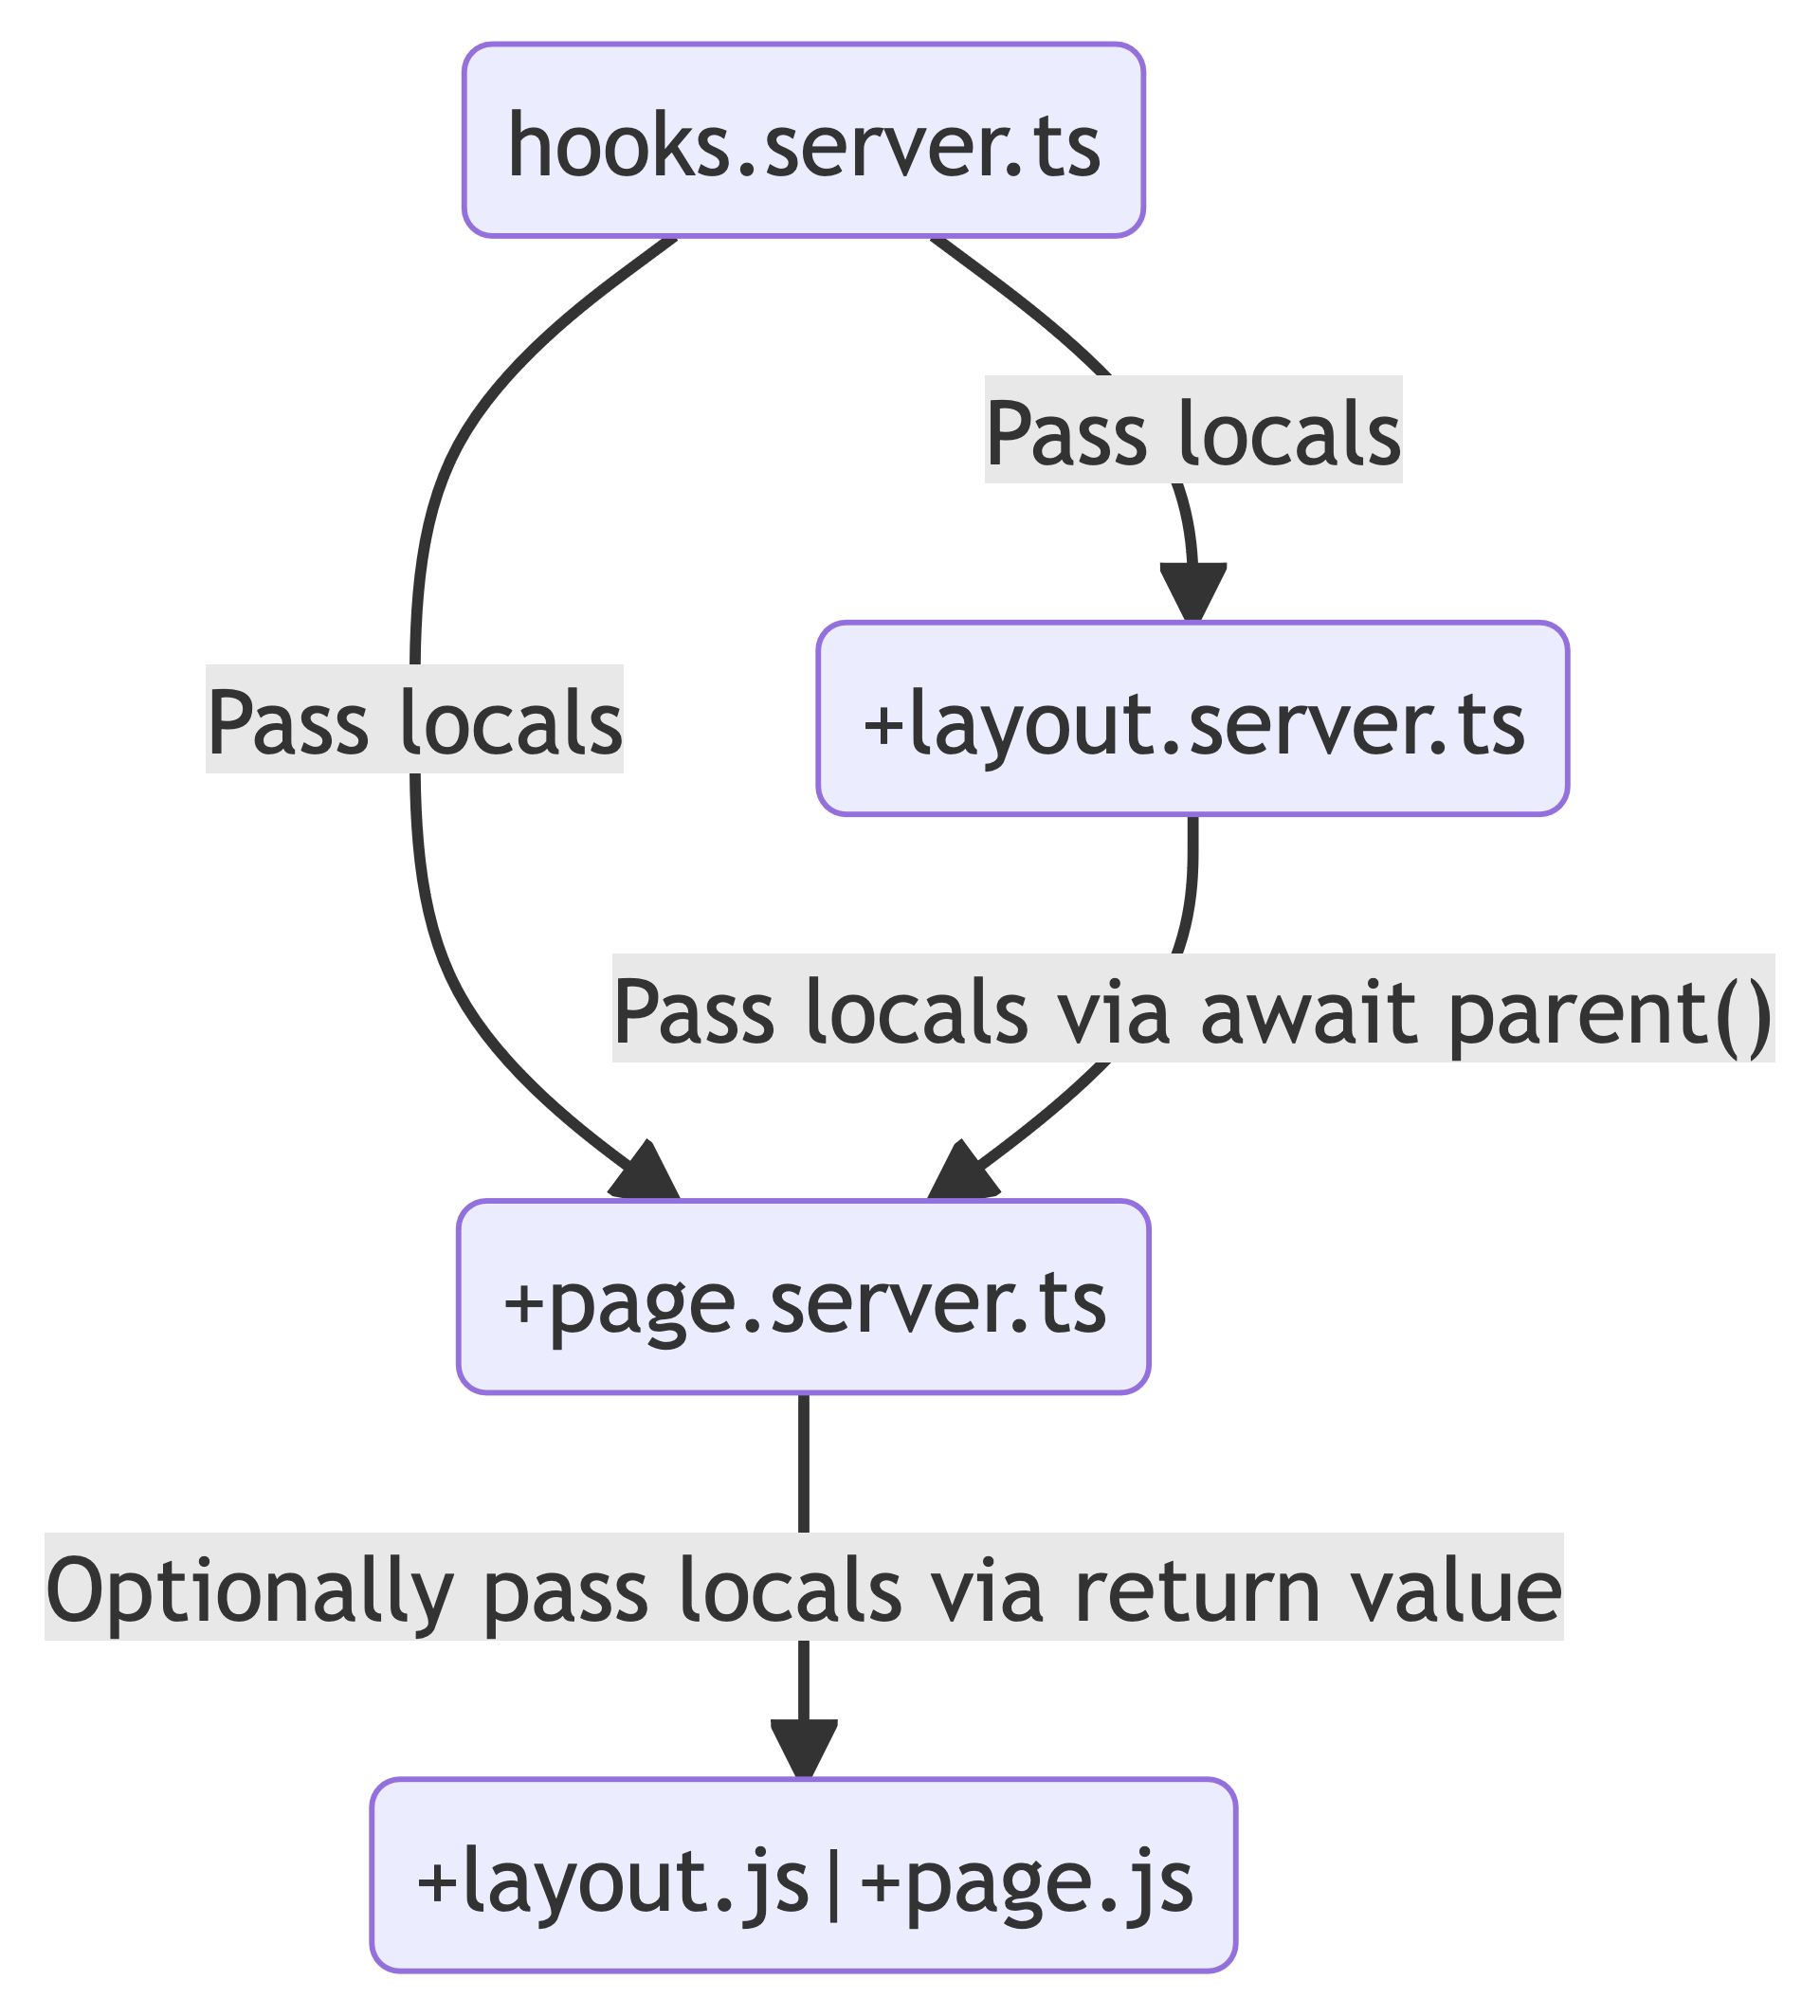
Important note: This diagram illustrates a feature in SvelteKit which is that layout and page layout functions run simultaneously. If you are setting your locals in hooks.server.ts this does not matter, but if you are setting locals in +layout.server.ts (not recommended) then you will need to use await parent() in +page.server.ts to make sure you won’t have a race condition between the two load functions.
Setting locals via hooks.server.js
Let’s look at a practical example of how to set locals. To demonstrate this we’re going to assign a random ID to each incoming request, set that ID as a locals value and then pass it all the way out to the user. If you’d like to follow along you can see the entire code on SvelteLab.
We’ll start by implementing a function for generating a random ID, implementing a handle hook and attaching the ID to locals.requestId:
// src/hooks.server.ts
import type { Handle } from '@sveltejs/kit';

// Generate a random ID
const getUniqueId = () => {
	return Math.random().toString(36).substr(2, 9);
}

export const handle: Handle = async ({ event, resolve }) => {
	// Attach id to locals
	event.locals.requestId = getUniqueId();
	const response = await resolve(event);
	return response;
};
In order to use our locals ID, we destructure locals in a page load function and return the value:
// src/routes/+page.server.ts
export async function load({ locals }) {
	return {
		requestId: locals.requestId,
	};
}
Finally, we’ll print it to the page:
<!-- src/routes/+page.svelte -->
<script lang="ts">
	export let data;
</script>

Unique request id: {data.requestId}
Every time you reload, you’ll see a unique number that was specific to that very request:
Implementing user theme preferences with locals
Now that we’ve gotten our feet wet with locals, let’s implement something a bit more advanced – a cookie-based toggle for light or dark mode. Follow along in this SvelteLab.
Let’s start by looking for the theme cookie and setting the locals.theme value to either light or dark depending on the user’s theme preference. (Don’t worry, we’ll set this cookie soon!)
// src/hooks.server.ts

import type { Handle } from '@sveltejs/kit';

export const handle: Handle = async ({ event, locals, resolve }) => {
	const cookieTheme = event.cookies.get('theme');
	event.locals.theme = cookieTheme === 'light' ? 'light' : 'dark';

	const response = await resolve(event);
	return response;
};
One thing to note is how we narrow down the value of event.locals.theme – it’s always going to be either light or dark. If we didn’t narrow it down the user could set locals value to anything, which is usually not desired and can be insecure if you are, for example, implementing a login system!
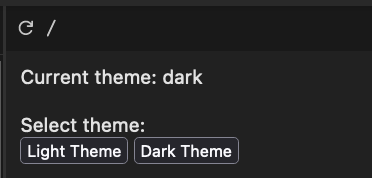
Now let’s make a basic form, it’s going to look like this:
The code for this would be:
<!-- src/routes/+page.svelte -->
<script>
	export let data;
</script>

Current theme: {data.theme} <br/>

Select theme:

<form method="post">
	<button type="submit" name="theme" value="light">Light Theme</button>
	<button type="submit" name="theme"  value="dark">Dark Theme</button>
</form>
We’re almost there! Let’s implement the Form Action that sets the theme cookie:
// src/routes/+page.server.ts

import type { Actions, PageServerLoad } from './$types';
import { redirect } from '@sveltejs/kit';

export const actions = {
	default: async ({ cookies, request }) => {
		const data = await request.formData();
		const theme = data.get('theme') === 'light' ? 'light' : 'dark';
		cookies.set('theme', theme);

		redirect(303, '/');
	},
} satisfies Actions;
Again, we make sure to only set the cookie to values we expect (light or dark). Although in this case, the user could manipulate the cookie value in their browser if they wanted.
Also worth noting is the redirect we performed at the end. The reason for this is that we need another round trip to the server to activate the cookie. If we didn’t perform a redirect we wouldn’t see the new cookie result immediately.
Let’s finish it up with the load function that returns the current locals value:
// src/routes/+page.server.ts

// Form Actions code here

export const load: PageServerLoad = async ({ locals }) => {
	return {
		theme: locals.theme
	};
};
And we’re done! We’ve got an SSR-friendly theme selector based on cookies and locals!
Using locals in +layout.server.ts
We already showed how to use locals in +page.server.ts above and it’s exactly the same in the layout – destructure { locals } from the load function event.
Using locals in +server.ts
To use locals in API routes, it’s exactly the same as in page and layouts, but you can destructure it from the HTTP verb methods – GET, POST, PATCH, PUT, DELETE, OPTIONS, and HEAD. For example:
// src/routes/api/+server.ts

import type { RequestHandler } from './$types';

export const GET: RequestHandler = ({ locals }) => {
    console.log(locals);
    // ...
}
Passing locals from the server to +page.js or +layout.js
As noted in the diagram at the top of this post, locals are not available in the universal load functions and have to be passed from the server to the client. First we return the locals value in the server function:
import type { PageServerLoad } from './$types'

export const load: PageServerLoad = async ({ locals }) => {
  return {
    theme: locals.theme,
  }
}
Then we can get it in +page.ts or +layout.ts by destructuring the data parameter:
import type { PageLoad } from './$types'

export const load: PageLoad = async ({ data }) => {
  return {
    theme: data.theme, // data comes from +page.server.ts
  }
}
Summary
I hope you enjoyed the article, feel free to ask any questions in the comments!
If you’d live to dive deeper into locals, I recommend the post SvelteKit Authentication Using Cookies by Joy Of Code!
Header / social image generated by DALL-E.
- In Koa, locals are typically added to the request through
ctx↩︎
View Comments
The Power of Constraints: Why Less is More in Social Media
Shortly after assuming his role as CEO for Twitter, Elon Musk announced that tweets...
 Tomasz
AuthorNice one.
 Orlando.
AuthorSaludos desde Colombia. Que fácil lo haces ver, excelente artículo. Que bueno sería un tutorial completo de Sveltekit. Gracias y Bendiciones!
 daniel
AuthorNice post
 Antoine
AuthorI have a problem with the diagram you made, I thought initially that hook only ran at the begginig, but actually no, it runs at the begginig and at the end of it.
Joy of code made a similar diagram with the same mistake.
Here is a dicussion that ilustrates this functionality:
https://github.com/sveltejs/kit/discussions/12376
 Stanislav Khromov
AuthorHey Antoine, thanks for your comment. The handle hook technically runs at both times, everything before `await resolve()` happens before load functions trigger, and everything after happens… after! 😄 But it is not a very common use case and your GitHub thread is specifically about how `transformPageChunk` works which is outside the scope of this article.
 Adam
Adam
Author“… but if you are setting locals in +layout.server.ts …”
I think you mean +layout.ts?
 Stanislav Khromov
AuthorHi Adam! I think it is correct as-is, you cannot access or set locals in +layout.ts or +page.ts, you have to always send them through the .server.ts load function first!
 Script Raccoon
AuthorNice article! Somewhat related, I still haven’t fully grasped the difference between the layout server load and the handle hook. Take your example: what is wrong with generating the ID in the layout server load? Then we don’t need the handle hook?
 Stanislav Khromov
AuthorThat’s a great question! Sometimes it is better to do things in a load function, since if you load data in handle and attach it to locals you then need a load function to pick that value up and pass it on.
In this particular case, the benefit is that handle hook runs for all server requests – initial SSR pageviews, client side navigations and +server.ts files. So for things that you want to be truly global – logging, auth and similar use cases, handle hook is the one place that all requests pass through!